Table of contents
はじめに
先日、tauri, svelte, daisyUI を使ってデスクトップアプリを作成する際の開発環境構築を行った。その際の手順をまとめたガイドになる。 ちなみに作成したデスクトップアプリは、こちらのリポジトリ で公開しているため、良かったら活用してほしい。
環境
- OS: Windows 10
- Node.js: v20.9.0
- rustc(cargo): 1.76.0
- tauri: 1.6.0
- svelte: 4.27.0
手順
-
Node.js のインストール
公式サイトからダウンロードし、インストールする。
-
Rust のインストール
rustupを使ってインストールする。
-
SvelteKit のインストール
以下のコマンドを実行して、Svelte のプロジェクトを作成する。
# プロジェクトディレクトリを作成
mkdir sample-prj
cd sample-prj
npm create svelte@latest .
npm install
npm create時に対話形式で質問がある。回答例を以下に示す。
┌ Welcome to SvelteKit! │ ◇ Where should we create your project? │ (hit Enter to use current directory) │ ◇ Which Svelte app template? │ Skeleton project │ ◇ Add type checking with TypeScript? │ Yes, using TypeScript syntax │ ◇ Select additional options (use arrow keys/space bar) │ Add ESLint for code linting, Add Prettier for code formatting │ └ Your project is ready! -
SvelteKitのSSGモードとする
ssg-adapter をインストールする。
npm install --save-dev @sveltejs/adapter-staticsvelte.config.js の 1 行目を以下のように変更する。
import adapter from "@sveltejs/adapter-static"; // This was changed from adapter-auto import { vitePreprocess } from "@sveltejs/vite-plugin-svelte"; /** @type {import('@sveltejs/kit').Config} */ const config = { // Consult https://kit.svelte.dev/docs/integrations#preprocessors // for more information about preprocessors preprocess: vitePreprocess(), kit: { adapter: adapter(), }, }; export default config;src/routes/+layout.tsを作成し、以下の内容を記述する。export const prerender = true; export const ssr = false; -
tauriのインストール
tauri のインストールコマンドを svelte の作成したプロジェクトディレクトリ内で行う。
cargo tauri initまた、対話形式となるため、以下のように回答する。
✔ What is your app name? · sample-prj ✔ What should the window title be? · sample-prj ? Where are your web assets (HTML/CSS/JS) located, relative to the "<current dir>/src-tauri/tauri.conf.json" file t✔ Where are your web assets (HTML/CSS/JS) located, relative to the "<current dir>/src-tauri/tauri.conf.json" file that will be created? · ../build ✔ What is the url of your dev server? · http://localhost:5173 ✔ What is your frontend dev command? · npm run dev ✔ What is your frontend build command? · npm run build -
フロントエンドからtauriの機能を呼び出すライブラリをインストールする
npm install @tauri-apps/apitauri 側に api を追加するため、
src-tauri/src/main.rsを以下のように変更する。fn greet(name: &str) -> Stringが追加し、tauri::generate_handler![greet]で api を追加している。// Prevents additional console window on Windows in release, DO NOT REMOVE!! #![cfg_attr(not(debug_assertions), windows_subsystem = "windows")] #[tauri::command] fn greet(name: &str) -> String { format!("Hello, {}!", name) } fn main() { tauri::Builder::default() .invoke_handler(tauri::generate_handler![greet]) .run(tauri::generate_context!()) .expect("error while running tauri application"); }svelte 側から追加した api を呼び出す。具体的には
src/lib/Greet.svelteを作成し、以下の内容を記述する。<script> import { invoke } from '@tauri-apps/api/tauri' let name = '' let greetMsg = '' async function greet() { greetMsg = await invoke('greet', { name }) } </script> <div> <input id="greet-input" placeholder="Enter a name..." bind:value="{name}" /> <button on:click="{greet}">Greet</button> <p>{greetMsg}</p> </div>src/routes/index.svelteに以下の内容へ変更する。<script> import Greet from '../lib/Greet.svelte' </script> <h1>Welcome to SvelteKit</h1> <Greet /> -
コンパイル
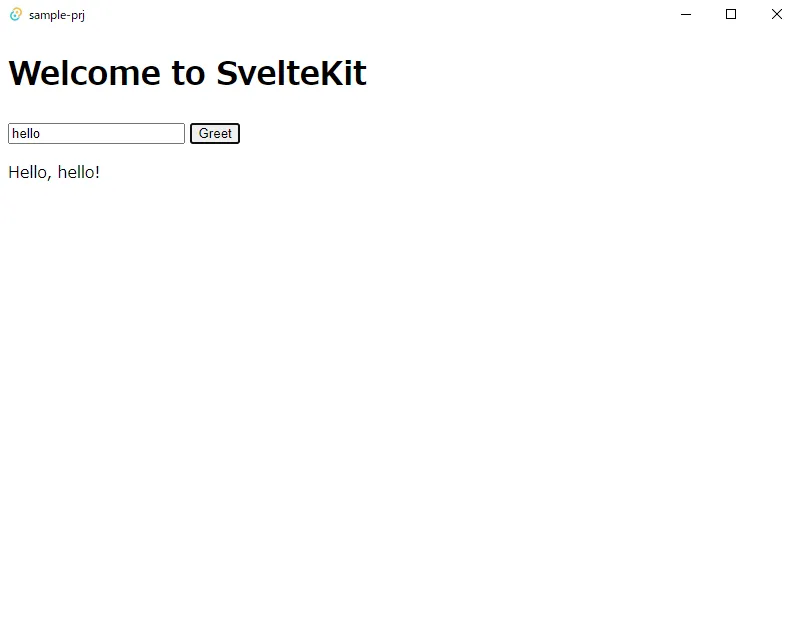
以下のコマンドをsrc-tauriディレクトリ内で実行する。(初回は時間がかかる。)
cargo tauri dev以下のような、ウィンドウが表示されれば成功している。
-
tailwindcssのインストール
tailwindcssのインストールを行う。
npm install -D tailwindcss postcss autoprefixer
npx tailwindcss init -p
tailwind.config.js を以下のように変更する。
/** @type {import('tailwindcss').Config} */ export default { content: ["./src/**/*.{html,js,ts,svelte}"], // This was changed from [] theme: { extend: {}, }, plugins: [], };src/app.cssを作成し、以下の内容を記述する。@tailwind base; @tailwind components; @tailwind utilities;作成した app.css を
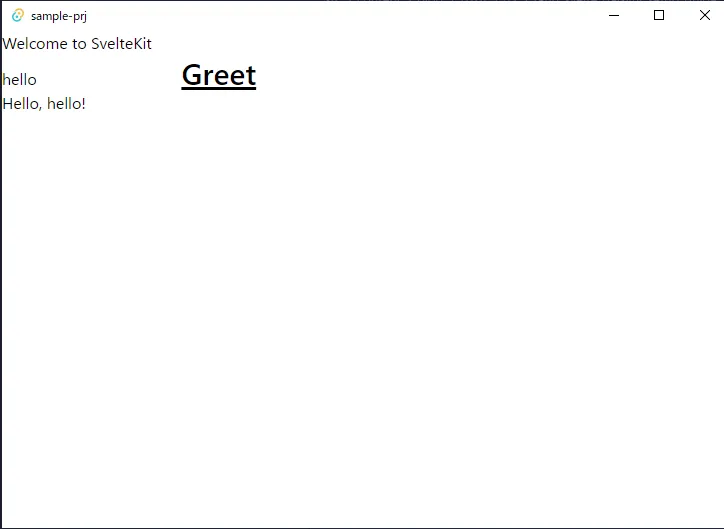
src/routes/+layout.tsで読み込む。export const prerender = true; export const ssr = false; import "./app.css";適当にtailwindcssを使ってデザインを変更する。
<button class="text-3xl font-bold underline" on:click="{greet}">
  Greet
</button>
変更されたことを確認する。
-
daisyUIのインストール
daisyUIのインストールを行う。
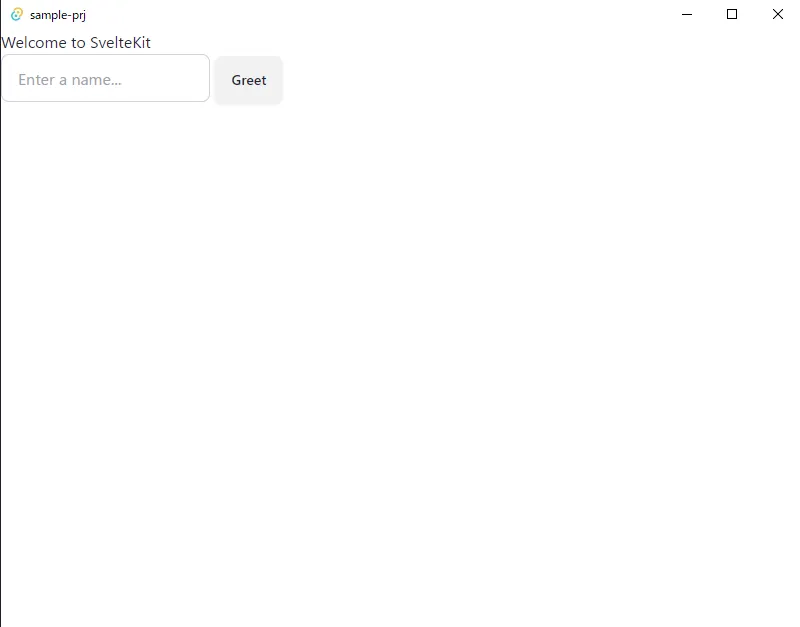
npm install -D daisyui@latesttailwind.config.jsを以下のようにdaisyuiを追加する。/** @type {import('tailwindcss').Config} */ export default { content: ["./src/**/*.{html,js,ts,svelte}"], theme: { extend: {}, }, plugins: [require("daisyui")], // This was changed from [] };daisyUIを使ってデザインを変更する。
<div>
  <input
    class="input input-bordered"
    id="greet-input"
    placeholder="Enter a name..."
    bind:value="{name}"
  />
  <button class="btn" on:click="{greet}">Greet</button>
  <p>{greetMsg}</p>
</div>
変更されたことを確認する。
おわりに
以上、tauri, svelte, daisyUI を使ってデスクトップアプリを作成する際の開発環境構築ガイドをまとめた。
最近話題の技術書
